A leaking humidifier can damage wood floors and promote mold. In 2026, most leaks are mechanical rather than structural. Follow these 5 fixes to identify and stop the puddle.
5 Ways to Fix a Leaking Humidifier
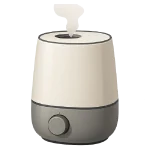
1Misaligned Tank or Plunger Valve
Most portable humidifiers use a gravity-fed system. A spring-loaded plunger valve at the bottom of the tank opens when it sits on a post in the base. If the tank is slightly tilted or the valve is caught on a piece of debris, the water won’t stop flowing once the base is full, leading to an overflow.
Care Plan
- Unplug the unit and remove the tank.
- Inspect the spring-loaded valve on the tank cap. Press it several times to ensure it snaps back into place firmly.
- Ensure the humidifier is sitting on a perfectly level surface. Even a slight incline can prevent the valve from seating correctly.
- Wipe the base post to remove any mineral grit that might prevent the valve from closing.
2Hairline Tank Cracks
Plastic tanks can develop hairline cracks due to thermal shock (alternating between very cold and very hot water) or prolonged UV exposure making the plastic brittle.
Care Plan
- Dry the tank completely and fill it with water to locate the source of the drip.
- If a crack is found, apply a thin layer of food-grade silicone sealant.
- Let the sealant cure for 24 hours for structural integrity and 48–72 hours for a full chemical cure before using it near water or electronics.
- Note: Cracks near the valve assembly are difficult to seal permanently; replacement is usually safer.
3Degraded Gaskets or O-Rings
The rubber O-ring inside the tank cap is the main barrier between a full tank and your floor. Over time, these gaskets dry out or flatten.
Care Plan
- Unscrew the tank cap and inspect the rubber ring for cracks or brittleness.
- Replace with a manufacturer-specific gasket or a matching size O-ring from a hardware store.
- Tip: Apply a tiny amount of food-grade silicone grease to the gasket to improve the seal and prevent the rubber from drying out. Avoid vegetable oil, which can go rancid and promote bacterial growth.
4Mineral Buildup on the Base Rim
Mineral scale buildup on the rim where the tank meets the base creates an uneven seating surface. This gap allows water to bypass the intended reservoir and leak under the force of gravity.
Care Plan
- Unplug the unit and empty the base.
- Use a 1:1 vinegar and water solution to soak the base and the tank cap for 20 minutes.
- Scrub away all white crusty buildup, especially around the edges where the tank seats.
- Rinse and dry the exterior before reassembling.
5Condensation Pooling (Nozzle Aim)
Sometimes the humidifier isn’t leaking—it’s “raining.” If the mist output is set too high or pointed at a cold surface, it turns back into liquid water and pools on the floor.
Care Plan
- Lower the mist output setting.
- General Recommendation: Move the humidifier at least 3 feet away from walls and electronics to allow mist to dissipate.
- Elevate the unit: Placing the unit 2 feet off the ground gives mist more time to evaporate. Caution: Confirm the leak is condensation and not a structural crack before placing it on furniture to avoid water damage.


